How to install and use OpenCode plugins
Install an OpenCode plugin, check that it loaded, and use Plannotator to review a plan in your browser and send a specific change back to the agent.
Posted by
 Lola
Related reading
How to create agents in OpenCode
Create primary agents and subagents in OpenCode. Add a Markdown file to your project, choose its mode, and run it with a working example.
How to connect an MCP server to OpenCode
Connect an MCP server to OpenCode, check its tools, and run a prompt that uses them. Includes configuration, authentication, and troubleshooting.
How to switch OpenCode models from Slack
Choose the OpenCode model Pipa uses for new Slack threads. Learn the model command, first-time setup, and what happens to existing conversations.
OpenCode plugins are code that extends OpenCode. A plugin can add tools, commands, or hooks: code that runs when something happens, such as a session receiving a prompt. Install a published plugin by adding its package to the plugins array in your OpenCode configuration, then check that it loaded.
A skill gives the agent instructions. An MCP server connects it to tools through a separate service. A plugin runs inside OpenCode to add behavior and can also supply skills.
This walkthrough uses Plannotator, a plugin for reviewing plans in a browser. You'll ask OpenCode for a small README plan, mark one passage, and send a change back. The result is a revised plan in the same OpenCode session, without implementing it.
Before you start
Start with OpenCode and a working model that can call tools, Node.js/npm for the install command below, and a browser. If you need the initial setup, follow the OpenCode installation guide. Use a project folder where you're comfortable trying a read-only planning request.
Use the current official CLI distribution. Plannotator requires Bun 1.4.4 or later when it uses OpenCode's embedded Bun runtime. Installing a separate Bun executable does not update that bundled runtime. In your terminal, install or update the CLI and check it:
npm install --global @opencode/cli
opencode --version
The commands below use opencode. The package also supplies opencode2; use one name consistently. If opencode plugin list is unavailable after installing, check which executable your shell is using. If an older installation still takes precedence, fix your PATH or use the package's opencode2 command for the remaining steps.
Step 1. Add the plugin to your project
In the project folder, open opencode.json or opencode.jsonc. Create one if it doesn't exist. Add this entry to its plugins array, keeping your other settings and plugin entries:
{
  "$schema": "https://opencode.ai/config.json",
  "plugins": [
    {
      "package": "@plannotator/opencode@0.28.49",
      "options": {
        "workflow": "plan-agent",
        "planningAgents": ["plan"]
      }
    }
  ]
}
The fixed package version makes this example repeatable. The options make Plannotator's submit_plan tool available to the built-in plan agent. These options belong to Plannotator; check each plugin's docs for its own settings. Only install packages whose code you trust: plugins execute inside OpenCode, rather than supplying instructions alone.
Step 2. Load it and check registration
Run these terminal commands from that same project folder:
opencode models
opencode reload
opencode plugin list
The first command opens the project in OpenCode's server and waits for plugin activation. Reload applies the configuration to the running server. Look for this row in the plugin list:
ID           VERSION  SOURCE
plannotator  0.28.49  @plannotator/opencode@0.28.49
The package name is @plannotator/opencode; its plugin ID is plannotator. A row confirms registration. The next steps check that it opens a review and returns feedback.
Step 3. Use the plugin
Follow the plugin's instructions to try what it adds to OpenCode. That could mean running a new command, asking the agent to use a tool, or sending a prompt that triggers a hook. For Plannotator, ask the plan agent to submit a plan for review. Run this in your terminal:
opencode run --agent plan 'Do not read or edit files or run shell commands. Create exactly this three-step README improvement plan: 1. Add a project description. 2. Add installation instructions. 3. Add usage examples. Submit the plan with submit_plan for browser review. After feedback, revise only the plan to reflect the feedback, print the revised plan, and STOP. Do not submit it again or implement it.'
Use your working default model, or add --model provider/model-id with an ID from opencode models. Plannotator is not tied to a particular provider. The agent should call submit_plan, then wait while the plan opens in your browser. Its wording can differ, but all three requested steps should be present.
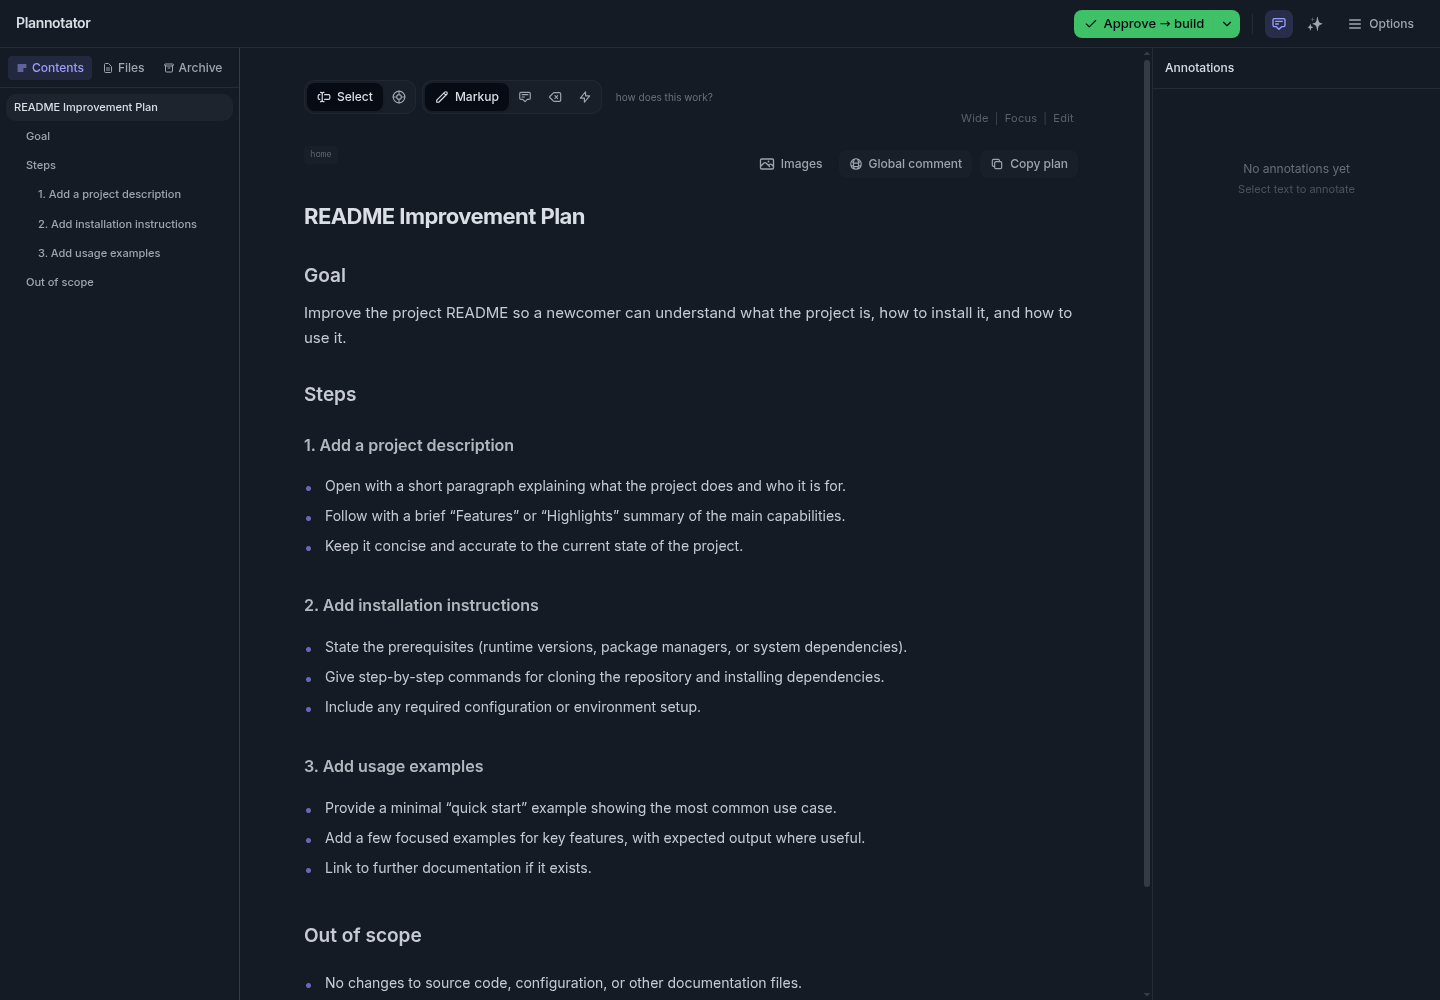
If the browser doesn't open, look for the Plannotator session link in OpenCode. For a remote machine, use a private port-forwarding route to reach that machine's review server; localhost in your browser otherwise points to your own computer. The maintainer's remote setup instructions explain the port settings. Don't publish the review server just to open this sample.
Step 4. Check the result
Try an action whose result you can check. With Plannotator, check that a comment from the browser reaches OpenCode and changes the plan.
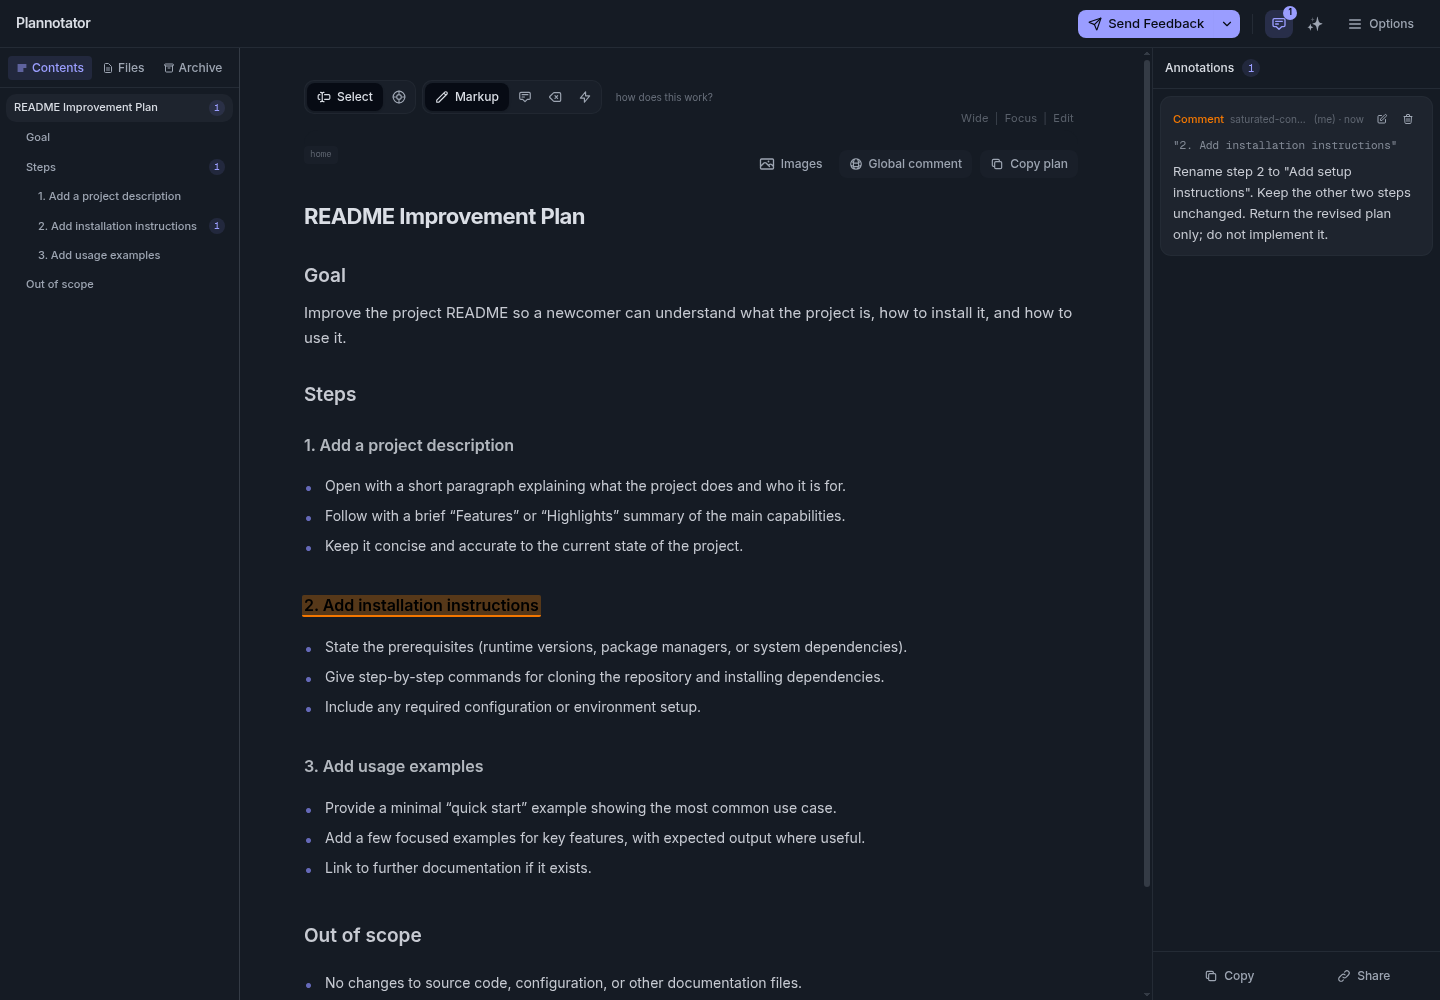
In Plannotator, select the text "Add installation instructions". Choose Comment, enter this note, and save it:
Rename step 2 to "Add setup instructions". Keep the other two steps unchanged. Return the revised plan only; do not implement it.
Check that the annotation shows the original passage and your comment. Choose Send Feedback to request changes, rather than Approve. Approval can hand the plan to the build agent; this example stops at the revised plan.
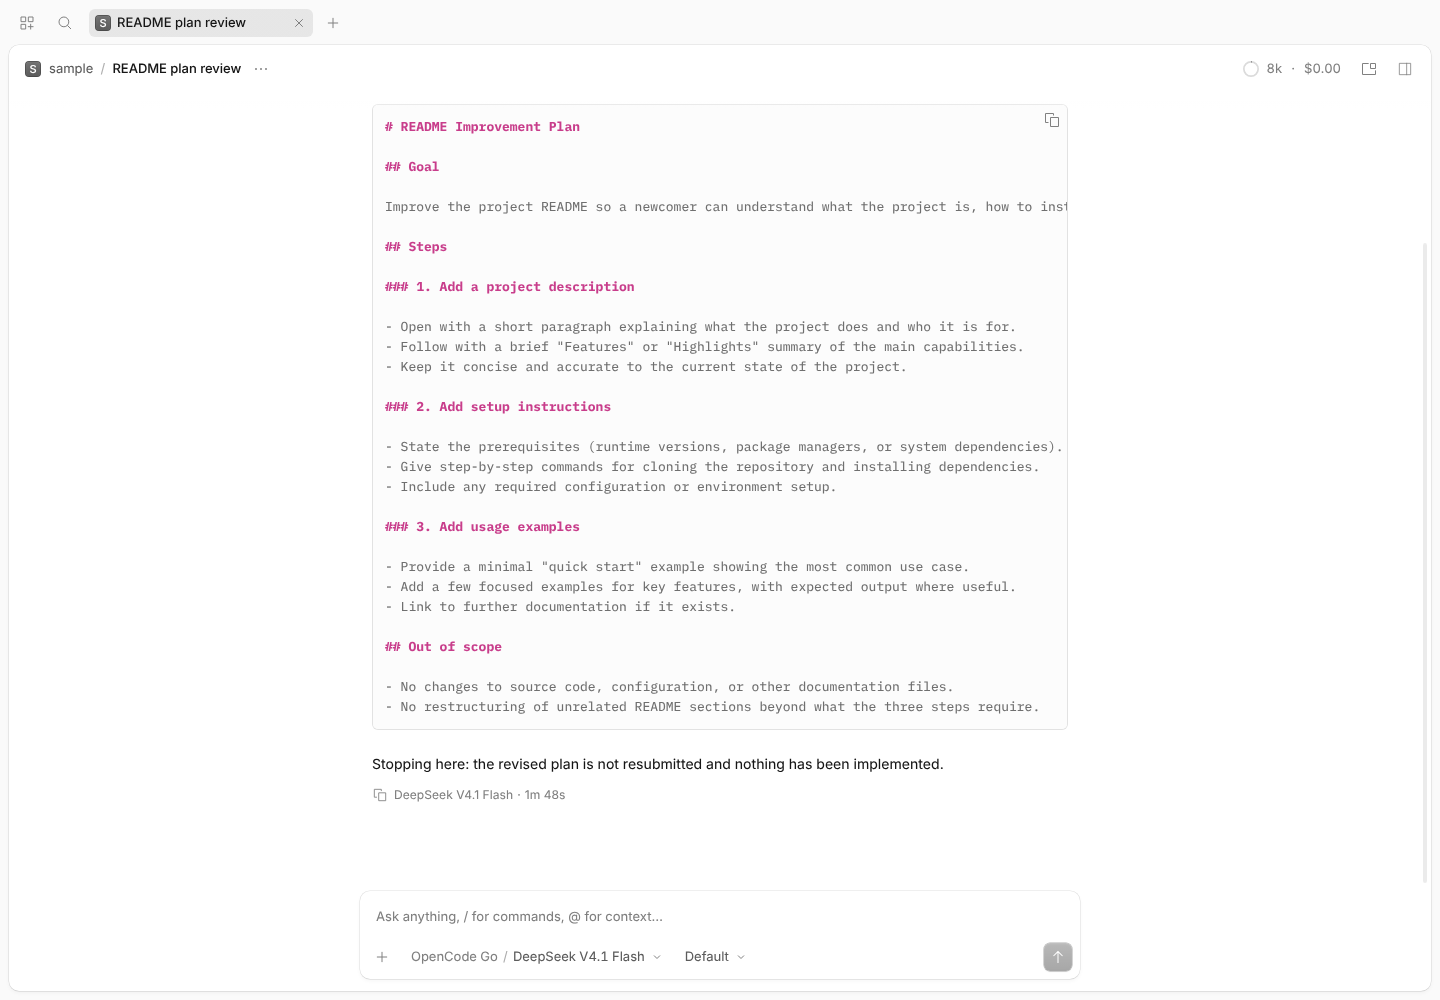
Return to the waiting OpenCode session. Confirm that the revised plan says "Add setup instructions", keeps the description and usage steps, and stops without changing project files.
If a plugin doesn't work
- Check that it loaded. Run
opencode plugin listfrom the project where you added it. If it's missing, check the package name and configuration for errors, then reload OpenCode. - Check how it runs. Read the plugin's instructions for the command, tool, or event that starts it. Some need an account, another installed tool, or a particular agent. If the plugin adds a tool for the model to call, the model needs a working connection and permission to use it.
- Read the error message. A failed package download, missing dependency, and model usage limit need different fixes. Compare the error with the plugin's troubleshooting instructions before changing your configuration.
Congratulations, you've installed and used an OpenCode plugin. Explore the OpenCode plugin ecosystem to find more things your setup can do.
If you want to take your setup further, try running OpenCode in Slack. I use Pipa, our business operations agent built on OpenCode, to run Lunch Pail Labs from Slack. Here's how to set it up.