How to install OpenCode and run your first prompt
Install OpenCode 2 on macOS, Linux, or Windows through WSL, connect a model provider, and run your first prompt. Includes screenshots and setup troubleshooting.
Posted by
 Lola
Related reading
How to create agents in OpenCode
Create primary agents and subagents in OpenCode. Add a Markdown file to your project, choose its mode, and run it with a working example.
How to connect an MCP server to OpenCode
Connect an MCP server to OpenCode, check its tools, and run a prompt that uses them. Includes configuration, authentication, and troubleshooting.
How to switch OpenCode models from Slack
Choose the OpenCode model Pipa uses for new Slack threads. Learn the model command, first-time setup, and what happens to existing conversations.
OpenCode is an AI coding agent you can use in your terminal. This guide uses OpenCode 2 and takes you from installation to a response about a file in your project.
Step 1. Check what you need
Use a terminal on macOS or Linux. On Windows, install Windows Subsystem for Linux (WSL) and run the Linux commands inside WSL. The OpenCode 2 installation guide also provides Windows binaries; Windows package managers are not supported.
You'll need an internet connection and access to a model provider. Have its API key ready if the connection method asks for one. Model access and billing depend on the provider.
The install script downloads a binary and does not require Node.js. To use the npm method instead, install Node.js and npm.
Already have OpenCode? Check before installing anything:
opencode --version
If it reports version 2.x, skip to Step 3. Otherwise, install OpenCode 2 below. Installing it can replace the opencode command you already have.
Step 2. Install OpenCode 2
Choose one method. You don't need to run all of them.
macOS, Linux, or Windows through WSL: install script
Run the command from the OpenCode 2 installation guide:
curl -fsSL https://opencode.ai/v2/install | bash
Follow the installer's instructions, then open a new terminal so it picks up any shell configuration change.
Already use Node.js? Install with npm
Install the @opencode/cli package:
npm install -g @opencode/cli
If npm reports that OpenCode's postinstall script was blocked, allow that package's script and reinstall:
npm install -g @opencode/cli --allow-scripts=@opencode/cli
Already use Homebrew on macOS or Linux?
With Homebrew, run:
brew install anomalyco/tap/opencode-v2
Step 3. Verify the installation and open a project
opencode --version
The output should report version 2.x. The screenshot shows 2.2.1; your version may differ.

Tested with OpenCode 2.2.1 on macOS using npm (October 29, 2026). The script, Homebrew, and WSL instructions follow the OpenCode 2 docs.
Open a project folder you want the agent to read. Replace the placeholder path with your folder's path:
cd /path/to/your/project
opencode
The second command opens OpenCode's terminal interface. Use a folder containing a README for the first prompt below. To follow the example, create a folder and save this as README.md before opening OpenCode:
# Weekly update demo

This folder holds a weekly project update.

Next task: ask Alex to approve the draft before publishing.
If your shell says opencode: command not found, open a new terminal and try again. For the install script, check that the directory it printed is in your shell's PATH, the list of directories it searches for commands. For npm, check that the global npm executable directory is in PATH.
Step 4. Connect a provider and choose a model
If /models lists a model you can use without connecting a provider, select it and continue to Step 5. The screenshots use Flint 40B Free; availability can change. To use a provider account, connect it below.
Inside OpenCode, type:
/connect
Choose your provider and follow the connection prompts. Enter an API key when requested. Keep it in the credential prompt, not in a project file or chat message. An API-backed provider may require billing or credits before it can answer.
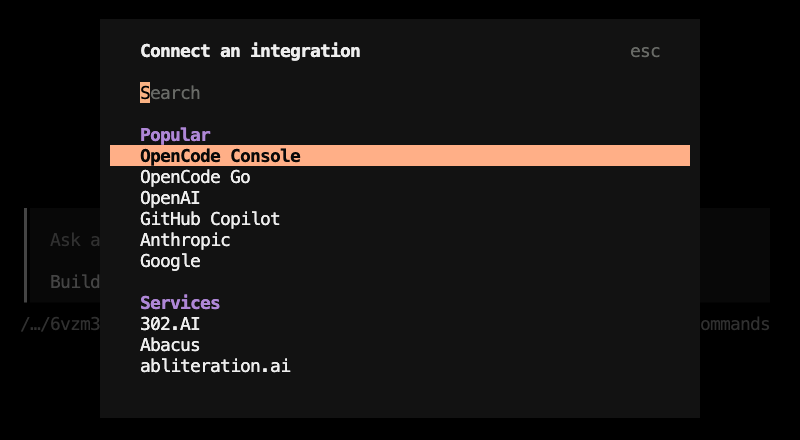
Then type:
/models
Select a model. Connecting a provider supplies access to its models; selecting a model chooses which one answers. The OpenCode 2 provider guide covers connection methods and account management.
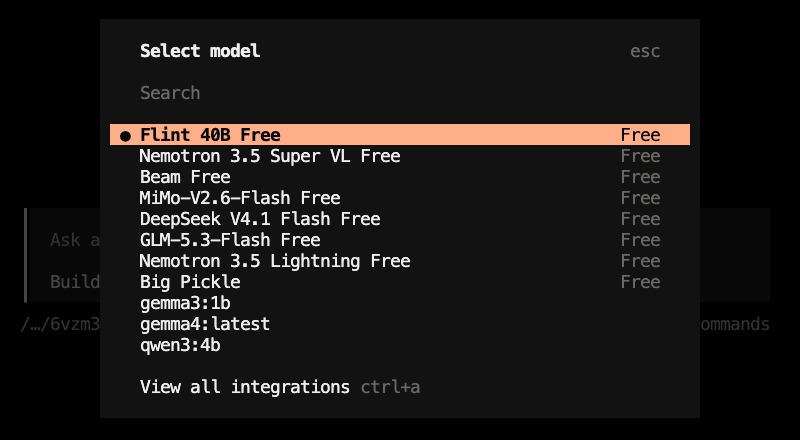
Step 5. Get a response
In the OpenCode prompt box, send:
Read README.md. Summarize what this folder is for in one sentence. If the file names a next task, report it; otherwise say that no next task is stated. Do not change files or run shell commands.
If your project has no README, replace README.md with a text file that exists in the folder.
The response should describe that file's contents. Check it against the file: the demo README says the folder holds a weekly project update, with Alex's approval as the next task.
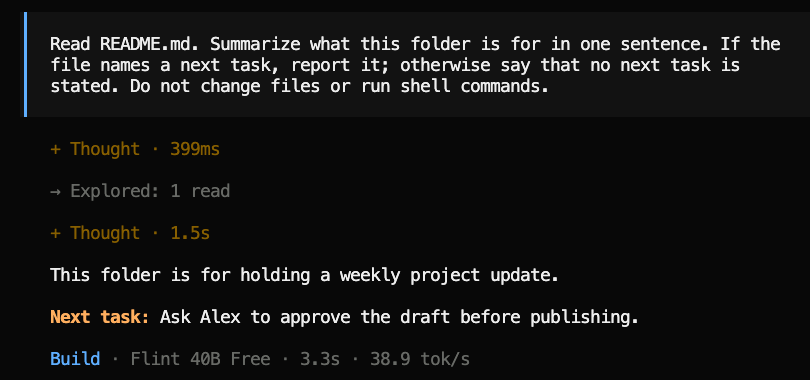
If you see an authentication or billing error, return to /connect and check the provider account. If OpenCode can't find the file, check the folder you launched it from and the filename in your prompt.
You can also send the same request from your shell once a model can respond. Open another terminal in the same project folder, then run:
opencode run "Read README.md. Summarize what this folder is for in one sentence. If the file names a next task, report it; otherwise say that no next task is stated. Do not change files or run shell commands."
FAQ
How do I update OpenCode later?
For npm, repeat npm install -g @opencode/cli. For Homebrew, use brew upgrade anomalyco/tap/opencode-v2. For the install script, rerun the v2 command in Step 2. Then verify with opencode --version.
Why does OpenCode say its postinstall script did not run?
Your package manager blocked the script that selects the binary for your platform. For npm versions with script approval, use the allow-scripts command in Step 2. If you deliberately disabled scripts, review that setting or use the install script instead.
Do I need to run /init before the first prompt?
No. You can ask it to read a file first. The /init command analyzes a project and creates an AGENTS.md instruction file; use it when you want project-specific guidance for future sessions.
Do I need a Git repository for the first prompt?
No. A folder containing README.md is enough for this example. OpenCode reads the folder you launch it in; Git is useful later for tracking and reviewing changes.
Next, follow the tutorial to run OpenCode from Slack with Pipa.